Photoguide for motorraces
When you attend a motorrace it is obvious to bring your camera along and take
pictures of the handsome racecars. Unfortunately you are often disappointed when
you sees the pictures developed. The reason is that there is a big difference in
taking a picture of your family and a racecar passing at 200 km/h.
In this small guide I will go through some tips for improving your camera
handling so you will get better pictures - for after all it is not that
difficult.
Equipment and technical:
When you are shooting photos there are a lot of parameters to adjust. I will
now go through a couple of them and give you some advice for taking pictures at
a motor race.
Aperture: The aperture works like our iris in our eye and decides how
much light to be let into the camera and onto the film. The values can be e.g.
f/2.8 - f/5.6 - f/16 - f/22. f/2.8 is a large aperture opening, and is therefore
known as "a high F-stop". f/22 defines a small aperture opening and is
known as "a low F-stop".
By adjusting the aperture it is possible to control how much of the picture,
before and after the object in focus, to be sharp (dept of field). By using
f/2.8 only a small area will be sharp, but at f/22 the picture will be sharp in
the depth.
For portrait shooting a large F-stop will be appropriate as it will soften
the background - while a picture of a landscape will be most decent with a small
F-stop as it will make the picture more sharp in dept of field.

- Are you going to take a portrait of Jan Magnussen or Tom K. then use f/2.8
or f/5.6. This will give you a sharp portrait with an unsharp background.
- Have you found a Ferrari 246 Dino at the parking ground and want to take
its picture, then use f/16 or f/22. This will make the car sharp from the
front to the tail.
- If you use a compact camera or a digital camera where you cannot adjust
the aperture, then use a build-in programme. I presume your camera does have
a portrait- or landscape programme.
Shutter speed: The shutter speed defines how long time the film is
exposed. A fast shutter speed is e.g. 1/500 sec. or 1/100 sec. A slow shutter
speed is 1/15 sec. or 1/8 sec. The fast shutter speed will freeze even fast
movements, while the slow one will blur even small changes in the picture.
It is important to choose a shutter speed which does not result in shaky
pictures. Normally you should not go below 1/60 sec. If you are using a tele
lens (or have zoomed in) then you should not go below 1/250 sec. Else you will
get unsharp shaken pictures.
The secret of handsome race pictures is the choice of shutter speed. If you
choose it too fast your picture will be actionless (it looks like the racecar is
parked on the track), and if you choose it too slow the whole picture will be
smudged.
- The shutter speed for motorracing I will recommend you to use either 1/125
sec. or 1/250 sec. This will give you a picture where the car is not too
smudged, but softens the background.
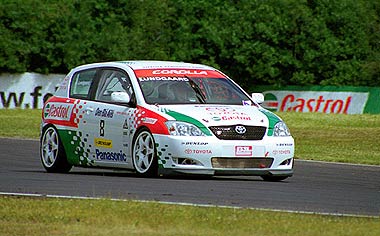
Here is Henrik Lundgaard's Toyota Corolla T-sport DTC photographed at
1/500 sec. With this shutter speed it looks like the car is parked on the track
- even the wheels are sharply frozen. This is useful when you want to freeze a
quick moment, but will result in a static and stationary picture. If the shutter
speed were slower - e.g. 1/125 sec. a more realistic feeling of speed will be
achieved.
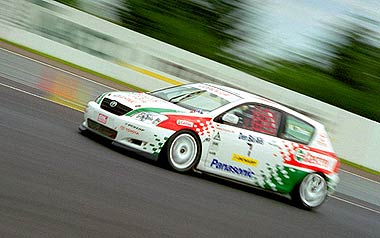
Here the photographer has turned when the car passed. Kurt Thimm's DTC
racer is now sharp against a blurred background - if you want the car to be more
sharp then choose a faster shutter speed. For this picture 1/30 sec. is used to
give a feeling of speed. Compare the picture with the one of Henrik Lundgaard's
car above - taken with 1/500 sec. This one gives an impression of action.
Lenses: Most cameras have a standard lens at 28-80 mm. This will be
sufficient if you are going to take some overview pictures. If you want to come
closer you need a tele lens - most likely a 80-200 mm. I prefer a zoom lens as
it is easy to decide how much of the picture to capture.
Choice of film: There are two types of film: slide film (transparency)
and negative film (print film). The negative films are the most widely used and
for motorrace it is to prefer to slide films as slide films are very sensitive
for wrong exposure. If you use negative film you can still use the pictures even
though you have under- or overexposured it.
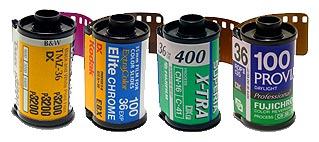
Films are light sensitive and the ISO value defines how much. A 100 ISO film
takes four times the amount of light as a 400 ISO film if you shoot under the
same conditions. On the other hand is a 100 ISO film more fine grained and
sharper when making large prints.
- Use a 400 ISO film when the light conditions can vary a lot.
- Kodak or Fuji films are to prefer.
- 36 exposure rolls are much cheaper than 24 exp. rolls.
- Never keep films in direct sun light.
- When you are to a motorrace then keep the film rolls in their canister and
in your pocket - always ready for a film change. At home you can keep your
unexposed films in the fridge or the freezer. In this way they will 'Stay
fresh' even though they exceed the use before date. This also allows you to
buy a large number of rolls and thereby get a discount.
Digital: There are two ways of getting digital pictures. Either you
can shoot the pictures with a digital camera or you can take the pictures with a
normal film and afterwards scan the pictures. This can be done through your
local photo service or you can use a scanner. There are both traditional flatbed
scanners and the more expensive and optimal film scanners.
If you choose to use a digital camera then it is important to ensure you have
enough memory cards with you. It is not very smart to run out of memory space in
the middle of a great motorrace.
As you can never know when you will shoot your super picture, it is important
to have your camera set for the hightest resolution and best quality. If the
picture does not look right, then delete it at once so you don't take up the
space on your memory card with bad pictures.
The shooting:
Now both the technical side and the equipment are covered we are ready to go
through the last section: the shooting. This is where the crucial moment for
your photo. Miss this and your picture is nothing worth - so stay tuned :-)
The pan: Often I see people take pictures of the racecar by standing
static and waiting for car to be right in the viewfinder - and then they push
the button. This is one reason for so many not-that-good-pictures…
When the racecar passes you at e.g. 160 km/h or more, it is important to
swing the camera along with the car. This is called panning. You simply aim at
the racecar when it arrives at the right and pan as the car passes you and
disappears at the left. When the car is right in front of you and your camera it
is the right time to release the button. Remember to keep moving the camera - so
don't stop panning when you have shot the picture! Practise so you are able to
pan at the same velocity as the car.
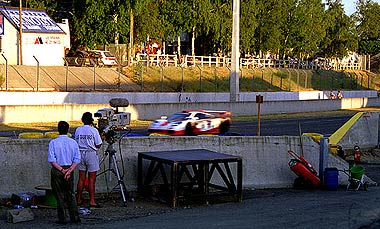
This picture shows a beautiful McLaren F1 GTR from Le Mans 1996 driven by
John Nielsen. Unfortunately the car is completely blurred as the photographer
was standing staticly and shooting pictures. If he had followed the trajectory
of the car the result would have been another.
Focusing: Many modern cameras have auto-focus - that is where the
camera takes care of adjusting the sharpness. This is a brilliant device but is
put on a hard test when using it at a moving racecar. Often the build-in motor
in the autofocus is not fast enough to keep the picture in focus when the car
passes at high speed. There are two main methods for focusing.
You can set the camera to use pending focus (AL-servo etc.) then the camera
will adjust the distance setting for the motive. This method needs a very fast
and precise focus motor and therefore this method is not always useable.
The second method is to prefer as it is better for fast moving object: Turn
off the auto-focus and adjust the distance manually. You can either turn the
distance-setting (if your camera does have such a device) adaptly when the car
passes - creating a manual-auto-focus, or you can use a focus trap.
The basic in a focus trap is to find the line almost every racecar uses when
passing you (the racing line). Then you locate the spot you want the car to be
on when taking its photo, and then preadjust the focus to this spot. With the
focus already set you just have to follow the racecar as it passes you (as you
learned under panning) and push the button when the car enters your photo trap.
The easiest way is to find a place where the racecars drive parallel to you as
the distance between you and the car is somewhat the same for a longer time. The
use of a photo trap results in a lot of sharp pictures...
Notice that if you are using f/2.8 or f/5.6 then the dept of field is reduced
- that is the sharp area in front of and behind the object in focus will be very
narrow. Therefore you have to be very accurate at focusing, or choose a higher
F-stop. If you use f/22 then you will ensure the car to be very sharp - but also
the background. The best trade-off is to use a shutter speed of 1/125 or 1/250
and a F-stop of f/8 or f/11. If the light conditions varies it is not always
possible to use this setting.
The shooting:
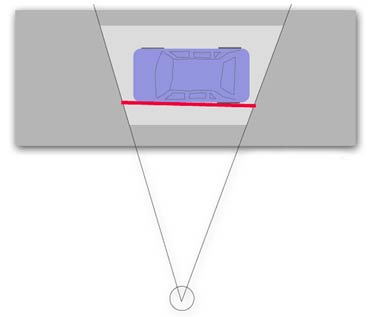
Camera parallel to the car.
The first illustration shows a racecar passing parallel to the photographer.
The 'V' shows the visual angle of the camera, and the red line shows where the
focus point is. The light area around the car shows the dept of field..
As the car arrives from the right and passes you, you aim at it, pans along,
and when it is nearly in front of you, you release the trigger. The camera has
to be adjusted in advance with the right F-stop and shutter speed and it also
has to be focused, but then all you have to do is to push the button.
This method results in a lot of good pictures if you can find a place where
the cars passes parallel to you and where there is not much fence. If this is
your only way to take pictures the result can be a bit monotonous, but it is a
good and useful way to document the cars running at the race. It is possible to
get some variation by using slower F-stops and thereby cause the picture to be
more speedy and actionful. Another way is to zoom so much onto the car that only
a small part of the vehicle is present in the viewfinder. Notice that the more
zooming the more important is it that the spot is in focus and you pan accurate.
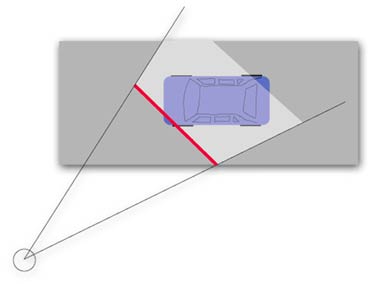
Camera non-parallel to the car.
The other illustration shows the same racecar but here shot diagonal to you.
This method is much more demanding than the first one. The result however is
much more exciting. The problem is that the racecar moves so quickly that you
have to be extremely fast at the trigger. It takes a while before you decide to
push the button before you actually do it, and to the camera exposes the film.
If the car drives e.g. 180 km/h then it will move 25 meters within half a second.
You can either do the focus ad hoc and then shoot - or you can make a photo
trap as described earlier.
Night shooting: Even though it is after dark it is still possible to
take good pictures. It just takes some settings on your camera to get a good
result.
If you want to grab the car lights as rows of light along the track, then you
have to use a shutter speed on a couple of seconds - this is self-evident as the
humble light conditions demands a long shutter speed. It is important to use a
tripod for the camera, or use some stable object (e.g. concrete wall or fence).
If you can come pretty close to the cars you can achieve a fascinating effect
by using a flash and a long exposure time. Adjust your camera to synchronize the
flash to use the second (last) shutter curtain. This function is often called
'2nd sync' and makes the flash fire just before the camera stops exposuring. If
using a shutter speed of e.g. 1/8 sec. then all light will be outlined while the
shutter is open - and at the end the flash freezes the moment before the shutter
shuts. This looks neat. If you don't have such adjustment choices on your camera,
then you should save your pictures to the sun returns again.
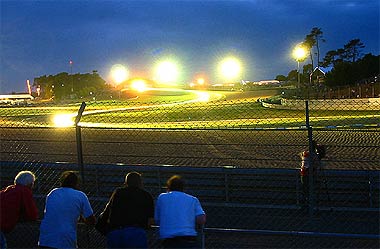
Night shooting with a long exposure time and the camera on a tripod.
Notice how the cars leave behind rows of light from their headlights.
Use of flash in the middle of the day: In the middle of the day the
bright sunlight generates solid shadows. One side of the car can be bathed in
sunlight (highlight) while the other is in shadow. The difference between these
two extremities can be too demanding for the film to cope with, and as a result
the part in the shadow will be completely black.
This can be solved by using the flash - yes, that's right - flash in the
middle of the day! Its job is to light up the shadows so the picture will be
more homogeneous. Especially for portrait pictures, as the portrait will be
improved. The contrast in the motive is lowered by lighting up the dark areas,
so the difference between highlight and shadow becomes more capable for the
film. So this trick results in better pictures.
If your flash supports adjusting the level of flash, try using this. On some
cameras this function is called 'fill-in'. A setting of -1.5 can be used as a
standard if there is already light at the motive (e.g. using flash in the middle
of the day). This setting tells the flash to adjust 1½ F-stop below what is to
be used for the exposure. The TTL function will then make sure to prelight the
motive enough without making it looks artificial.
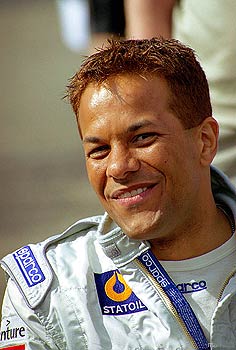
The picture of Jason Watt taken in full daylight with the use of a flash.
The flash made sure the picture got a homogeneously light setting.
Picking the place:
When picking the place to take photographs from it is an advantage to know
the track and surroundings. A way to get to find the spots is to walk besides
the track - against the direction of driving - and find the places where it is
possible to take pictures of the cars. Be creative and try to find different
angles to the track, so your pictures will be varied.
At Le Mans it is possible to walk from Tertre Rouge and down to the Ford
chicane on both the inner- and outer part of the track, and here you can look
for places without fences. By mooving against the direction of driving you both
keep track of the racecars and you are also able to see how the cars looks at
the track in a given position: Normally you would like to take the picture with
the front of the racecar towards you.
At Tertre Rouge it is possible to take pictures of the cars without fence
before they enters Mulsanne. Before the Esses there is also a spot without fence.
Vary your shots, and not exposure all fifteen rolls of film at the same spot:
Too many pictures from the same place will be monotonous - even though the cars
appears without fence!
By both choosing places where the cars races at high speed and at low speed
you will get a fascinating mixture of pictures with you from the race track.
Remember to take pictures of the crowd of spectators and grab some of the
atmosphere. At Arnarge at Le Mans you also have a place without fence. In front
of the curve there is a huge embankment so you can take pictures above the fence.
The obvious photo opportunity is Friday afternoon inside the old town of Le
Mans at the drivers presentation. Each driver team is driven around a route in
an old vintage racecar. All the names are present and passes you just in front
of your camera!
If you can come close to the garages at a race you are able to get good still
pictures of the cars, mechanics and drivers. Such pictures can be very
informative (especially if you afterwards are going to do a scale model of the
racecar) but also such pictures can be artistically if you are using your
imagination.

It is easy to find the handsome cars at the parking space
or around the race track.
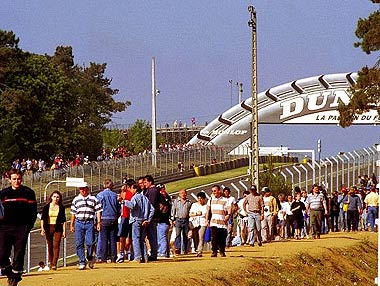
The area after the Dunlop bridge is a fine place for taking
pictures.
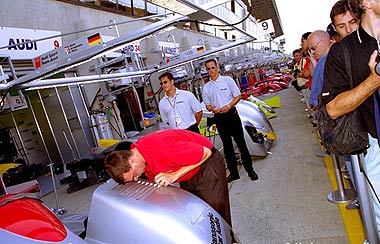
Friday from 10am to 10pm it is possible to get inside the
pit area and very close to the racecars and maybe also the drivers.
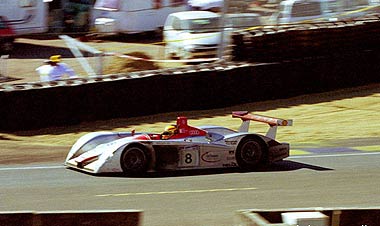
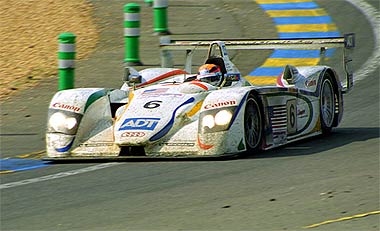
Using pan and a suitable shutter speed makes the picture
sharp and properly blurred. Here is an Audi R8 shot at the Esses.
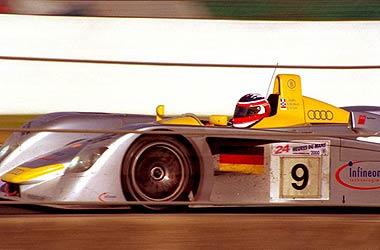
By zooming close to the racecar you will get the feeling of
speed.
>> Back to Information